 Kawasaki Z1000SX - Service manual > Battery Removal
- Turn off the ignition switch.
- Remove:
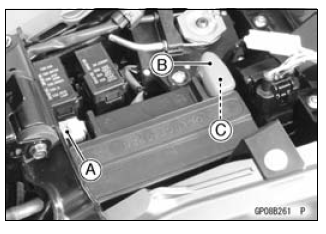
Front Seat (see Front Seat Removal in the Frame chapter) - Disconnect the negative (-) cable [A].
NOTICE Be sure to disconnect the negative (-) cable first.
- Slide out the positive (+) terminal cap [B] and disconnect the positive (+) cable [C].
- Remove the battery.
Battery Installation
- Turn off the ignition switch.
- Put the battery into the battery case.
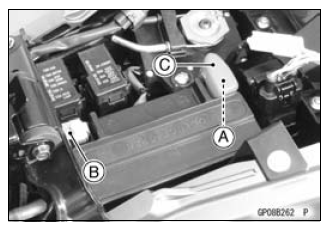
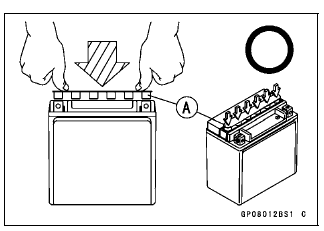
- Install the positive (+) cable [A] first.
- Install the negative (-) cable [B].
- Apply a light coat of grease on the terminals to prevent corrosion.
- Cover the Positive (+) terminal with the cap [C].
Battery Activation
Electrolyte Filling
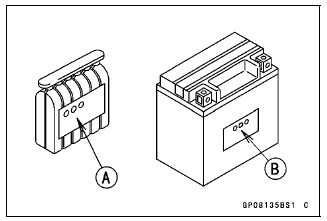
- Make sure that the model name [A] of the electrolyte container matches
the model name [B] of the battery. These names must be the same.
Battery Model Name
ZX1000G/H: YTX9-BS
NOTICE Each battery comes with its own specific electrolyte container; using the wrong container may overfill the battery with incorrect electrolyte, which can shorten battery life and deteriorate battery performance.
Be sure to use the electrolyte container with the same model name as the battery since the electrolyte volume and specific gravity vary with the battery type.
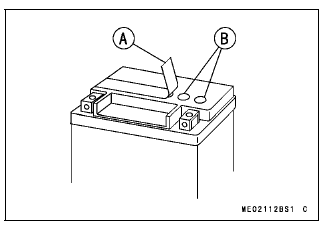
NOTICE Do not remove the aluminum sealing sheet [A] from the filler ports [B] until just prior to use. Be sure to use the dedicated electrolyte container for correct electrolyte volume.
DANGER Sulfuric acid in battery electrolyte can cause severe burns. To prevent burns, wear protective clothing and safety glasses when handling electrolyte. If the electrolyte comes in contact with your skin or eyes, wash the area with liberal amounts of water and seek medical attention for more severe burns.
- Place the battery on a level surface.
- Check to see that the sealing sheet has no peeling, tears, or holes in it.
- Remove the sealing sheet.
NOTE
- The battery is vacuum sealed. If the sealing sheet has leaked air into the battery, it may require a longer initial charge.
- Remove the electrolyte container from the vinyl bag.
- Detach the strip of caps [A] from the container and set aside, these will be used later to seal the battery.
NOTE
- Do not pierce or otherwise open the sealed cells [B] of the electrolyte container. Do not attempt to separate individual cells.

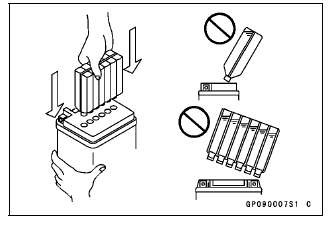
- Place the electrolyte container upside down with the six sealed cells into the filler ports of the battery. Hold the container level, push down to break the seals of all six cells. You will see air bubbles rising into each cell as the ports fill.
NOTE
- Do not tilt the electrolyte container.
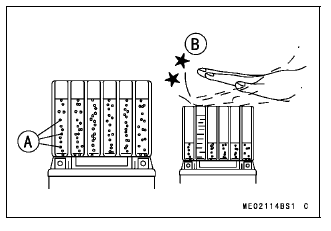
- Check the electrolyte flow.
If no air bubbles [A] are coming up from the filler ports, or if the container cells have not emptied completely, tap the container [B] a few times.
NOTE
- Be careful not to have the battery fall down.
- Keep the container in place. Don't remove the container from the battery, the battery requires all the electrolyte from the container for proper operation.
NOTICE Removal of the container before it is completely empty can shorten the service life of the battery.
Do not remove the container until it is completely empty.
- After filling, let the battery sit for 20 - 60 minutes with the electrolyte container kept in place, which is required for the electrolyte to fully permeate into the plates.
- Make sure that the container cells have emptied completely, and remove the container from the battery.
- Place the strip of caps [A] loosely over the filler ports, press down firmly with both hands to seat the strip of caps into the battery (don't pound or hammer). When properly installed, the strip of caps will be level with the top of the battery.
NOTICE Once the strip of caps is installed onto the battery, never remove the caps, nor add water or electrolyte to the battery.
NOTE
- Charging the battery immediately after filling can shorten service life.
Initial Charge
- Newly activated sealed batteries require an initial charge.
Standard Charge: 0.9 A × 5 - 10 hours
If using a recommended battery charger, follow the charger's instructions for newly activated sealed battery.
Kawasaki-recommended chargers:
Battery Mate 150-9
OptiMate PRO 4-S/PRO S/PRO2
Yuasa MB-2040/2060
Christie C10122S
If the above chargers are not available, use equivalent one.
- Let battery sit 30 minutes after initial charge, then check voltage using a voltmeter. (Voltage immediately after charging becomes temporarily high. For accurate measuring, let the battery sit for given time.)
NOTE
- Charging rates will vary depending on how long the battery has been stored, temperature, and the type of charger used. If voltage is not at least 12.8 V, repeat charging cycle.
- To ensure maximum battery life and customer satisfaction, it is
recommended the battery be load tested at three times its amp-hour rating
for 15 seconds.
Re-check voltage and if less than 12.8 V repeat the charging cycle and load test. If still below 12.8 V the battery is defective.
See also:
 Kawasaki Z1000SX - Service manual > Precautions
1) No need of topping-up. No topping-up is necessary in this battery until it ends its life under normal use. Forcibly prying off the seal cap to add water is very dangerous. Never do that.
 Rider's Manual BMW R 1250 GS GSA
 Owner's Manual Harley-Davidson Sportster XL1200X Forty-Eight
 Owner's Manual Honda CBR650R
 Service manual Honda CBR650
 Owner's Manual Honda PCX125
 Owner's Manual Kawasaki Z1000SX
 Service manual Kawasaki Z1000SX
 Owner's Manual Lexmoto Echo
 Owner's Manual Royal Enfield Interceptor 650
 Service manual Royal Enfield Interceptor 650
 Owner's Manual Yamaha MT-07