 Kawasaki Z1000SX - Service manual > Clutch Installation
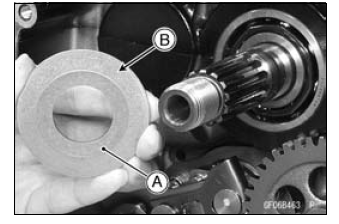
- Install the spacer (
 56
× 25) [A] so
that the tapered side [B] faces inward.
56
× 25) [A] so
that the tapered side [B] faces inward.
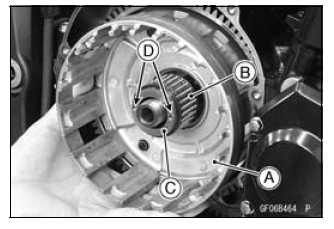
- Install the clutch housing [A] to the drive shaft.
- While holding the clutch housing, install the needle bearing [B] and
sleeve [C].
- The holes [D] of the sleeve face outward.
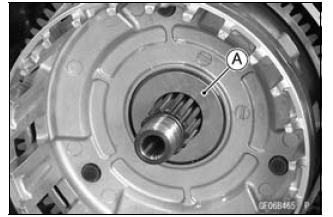
- Install the following parts to the drive shaft.
Spacer (
47 × 25.5)
[A]
Clutch Hub
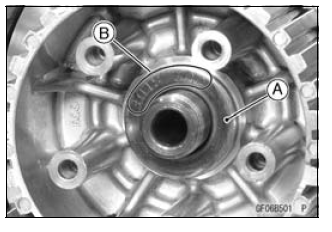
- Install the washer [A] so that the "OUTSIDE" mark [B] faces outward.
- Replace the clutch hub nut with a new one.
- Holding the clutch hub, tighten the clutch hub nut.
Special Tool - Clutch Holder: 57001-1243
Torque - Clutch Hub Nut: 135 N*m (13.8 kgf*m, 99.6 ft*lb) - Install the spring seat [A] and spring [B] as shown in the figure.
Clutch Hub [C]
- Install the friction plates and steel plates, starting with a friction plate and alternating them.
NOTE
- Install the both ends marked two friction plates at disassembled to the their original position.
- When replace the friction plates with new ones, mark the both ends two friction plates so that the two kinds of friction plates do not mix up at opening the package.
NOTICE If new dry friction plates and steel plates are installed, apply engine oil to the surfaces of each plate to avoid clutch plate seizure.
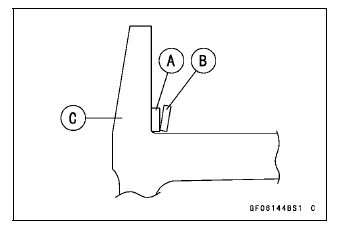
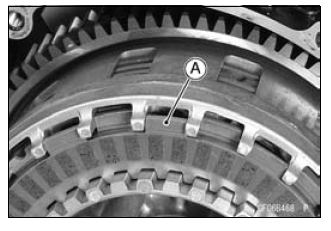
- Install the last friction plate [A] fitting the tangs in the grooves in the housing as shown in the figure.
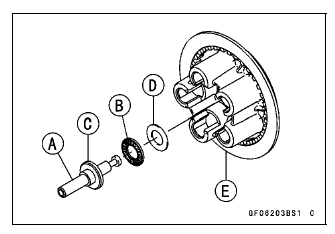
- Apply molybdenum disulfide grease to the pusher shaft [A].
- Apply engine oil to the needle bearing [B].
- Install the pusher [C], needle bearing and washer [D] in the clutch spring plate [E].
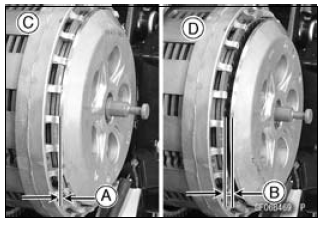
- Install the clutch spring plate so that there are no gap [A].
If it has gap [B], turn the clutch spring plate to install it again.
[C] Correct
[D] Wrong - Install:
Clutch Springs - Tighten:
Torque - Clutch Spring Bolts: 9.0 N*m (0.90 kgf*m, 80 in*lb) - Install the clutch cover (see Clutch Cover Installation).
See also:
 Kawasaki Z1000SX - Service manual > Clutch
Remove: Clutch Cover (see Clutch Cover Removal) Clutch Spring Bolts [A] Clutch Springs Clutch Spring Plate [B] (with Washer, Needle Bearing and Pusher [C]) Remove: Friction Plates and Steel Plates Spring and Spring Seat
Kawasaki Z1000SX - Service manual > Clutch Plate Assembly Inspection
Inspect the friction plate thickness (see Clutch Plate, Wear, Damage Inspection). Measure the length [A] of the clutch plate assembly as shown in the figure. Assemble: Clutch Hub [B] Spring Seat [C] Spring [D] Friction Plates [E] Steel Plates [F] Clutch Spring Plate [G] Clutch Springs [H] Clutch Spring Bolts [I]
 Rider's Manual BMW R 1250 GS GSA
 Owner's Manual Harley-Davidson Sportster XL1200X Forty-Eight
 Owner's Manual Honda CBR650R
 Service manual Honda CBR650
 Owner's Manual Honda PCX125
 Owner's Manual Kawasaki Z1000SX
 Service manual Kawasaki Z1000SX
 Owner's Manual Lexmoto Echo
 Owner's Manual Royal Enfield Interceptor 650
 Service manual Royal Enfield Interceptor 650
 Owner's Manual Yamaha MT-07