 Kawasaki Z1000SX - Service manual > Clutch
Clutch / Clutch
- Remove:
Clutch Cover (see Clutch Cover Removal)
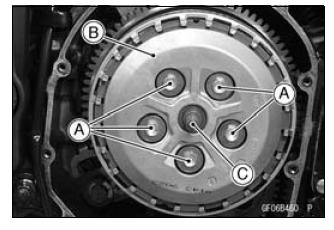
Clutch Spring Bolts [A]
Clutch Springs
Clutch Spring Plate [B] (with Washer, Needle Bearing and Pusher [C]) - Remove:
Friction Plates and Steel Plates
Spring and Spring Seat
NOTE
- The two plates at both ends are different from the plate installed
between these plates.
However, it is impossible to identify it on externals.
- Mark and record the locations of the friction plates so that they can be reinstalled in their original positions.
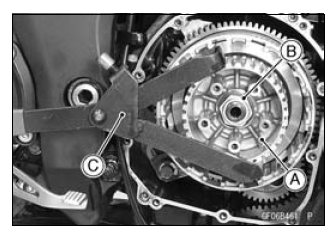
- Holding the clutch hub [A], remove the nut [B] and washers.
Special Tool - Clutch Holder [C]: 57001-1243
- Remove:
Clutch Hub
Spacer ( 47 × 25.5)
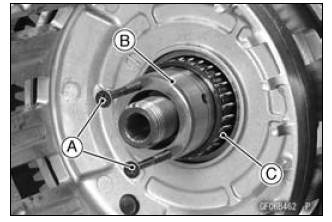
- Using the two M4 bolts or screws [A], pull out the sleeve [B], and then remove the needle bearing [C] and clutch housing.
- Remove the spacer ( 56
× 25).
See also:
 Kawasaki Z1000SX - Service manual > Clutch Lever and Cable
Clutch Lever Free Play Inspection Refer to the Clutch Operation Inspection in the Periodic Maintenance chapter. Clutch Lever Free Play Adjustment Refer to the Clutch Operation Inspection in the Periodic Maintenance chapter.
Kawasaki Z1000SX - Service manual > Clutch Installation
Install the spacer ( 56 × 25) [A] so that the tapered side [B] faces inward. Install the clutch housing [A] to the drive shaft. While holding the clutch housing, install the needle bearing [B] and sleeve [C]. The holes [D] of the sleeve face outward. Install the following parts to the drive shaft.
 Rider's Manual BMW R 1250 GS GSA
 Owner's Manual Harley-Davidson Sportster XL1200X Forty-Eight
 Owner's Manual Honda CBR650R
 Service manual Honda CBR650
 Owner's Manual Honda PCX125
 Owner's Manual Kawasaki Z1000SX
 Service manual Kawasaki Z1000SX
 Owner's Manual Lexmoto Echo
 Owner's Manual Royal Enfield Interceptor 650
 Service manual Royal Enfield Interceptor 650
 Owner's Manual Yamaha MT-07