 Kawasaki Z1000SX - Service manual > Clutch Lever and Cable
Clutch Lever Free Play Inspection
- Refer to the Clutch Operation Inspection in the Periodic Maintenance chapter.
Clutch Lever Free Play Adjustment
- Refer to the Clutch Operation Inspection in the Periodic Maintenance chapter.
Clutch Cable Removal
- Remove the right lower fairing (see Lower Fairing Removal in the Frame chapter).
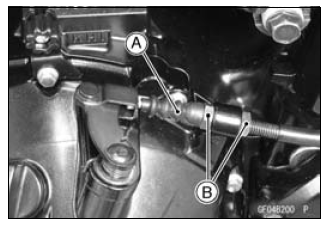
- Slide the dust cover [A] at the clutch cable lower end out of place.
- Loosen the nuts [B], and slide the lower end of the clutch cable to give the cable plenty of play.
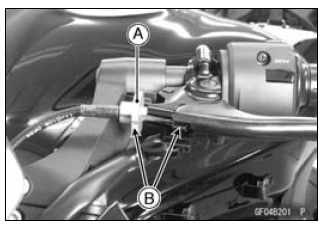
- Screw in the adjuster [A].
- Line up the slots [B] in the clutch lever and adjuster, and then free the cable from the lever.
- Free the clutch inner cable tip from the clutch release lever.
- Pull the clutch cable out of the frame.
Clutch Cable Installation
- Run the clutch cable correctly (see Cable, Wire, and Hose Routing section in the Appendix chapter).
- Adjust the clutch cable (see Clutch Operation Inspection in the Periodic Maintenance chapter).
Clutch Cable Lubrication
- Refer to the Chassis Parts Lubrication in the Periodic Maintenance chapter.
Clutch Lever Assembly Installation
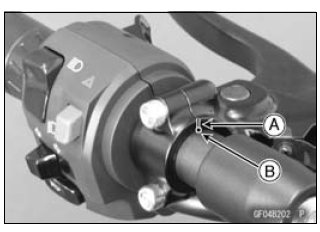
- Install the clutch lever so that the mating surface [A] of the clutch lever clamp is aligned with the punch mark [B].
- Tighten the upper clamp bolt first, and then the lower clamp bolt. There will be a gap at the lower part of the clamp after tightening.
Clutch Cover
Clutch Cover Removal
- Remove:
Rear Lower Fairing (see Rear Lower Fairing Removal in the Frame chapter)
Engine Oil (Drain, see Engine Oil Change in the Periodic Maintenance chapter)
Clutch Cable Lower End
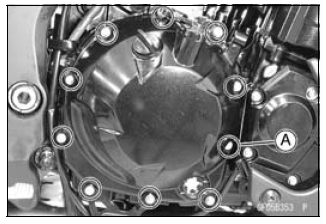
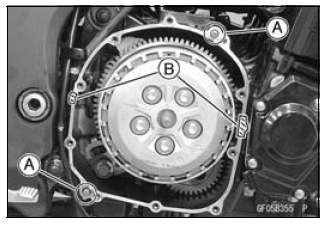
Clutch Cover Mounting Bolts [A]
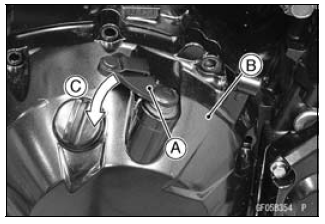
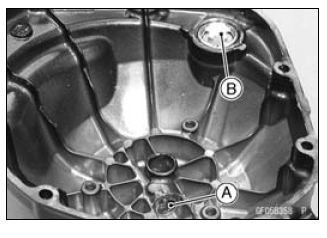
- Turn the release lever [A] toward the rear as shown in the figure, and
remove the clutch cover [B].
About 90º [C]
Clutch Cover Installation
- Be sure to dowel pins [A].
- Apply silicone sealant to the area [B] where the mating surface of the
crankcase touches the clutch cover gasket.
- Using a high-flash point solvent, clean off any oil or dirt that may be on the liquid gasket coating area. Dry them with a clean cloth.
Sealant - Liquid Gasket, TB1211F: 92104-0004
- Replace the clutch cover gasket with a new one and install it.
- Tighten:
Torque - Clutch Cover Bolts: 9.8 N*m (1.0 kgf*m, 87 in*lb)
Release Shaft Removal
NOTICE Do not remove the clutch release lever and shaft assembly unless it is absolutely necessary. If removed, the oil seal replacement may be required.
- Remove the clutch cover (see Clutch Cover Removal).
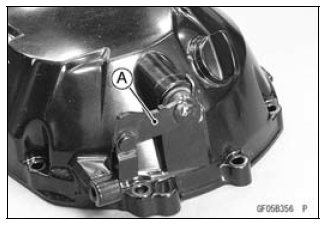
- Pull the release lever and shaft assembly [A] straight out of the clutch cover.
Release Shaft Installation
- Apply grease to the oil seal lips on the upper ridge of the clutch cover.
- Apply engine oil to the needle bearings in the hole of the clutch cover.
- Apply molybdenum disulfide grease to the pusher-holding portion [A] on the release shaft.
- Install the washer [B] and spring [C].
- Insert the release shaft straight into the upper hole of the clutch cover.

NOTICE When inserting the release shaft, be careful not to remove the spring of the oil seal.
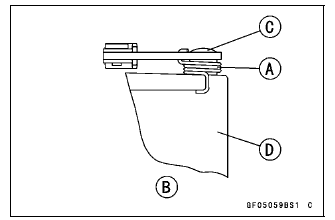
- Fit the spring [A] as shown in the figure.
Viewed from Rear [B]
Release Shaft [C]
Clutch Cover [D]
Clutch Cover Disassembly
- Remove:
Clutch Cover (see Clutch Cover Removal)
Release Lever and Shaft Assembly (see Release Shaft Removal)
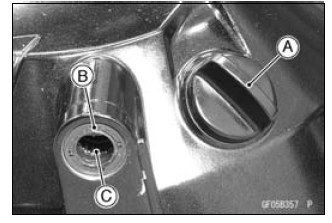
Oil Filler Plug [A]
Oil Seal [B]
Needle Bearing [C]
- Remove:
Needle Bearing [A]
Oil Level Gauge [B]
Clutch Cover Assembly
- Replace the needle bearings and oil seal with new ones.
NOTE
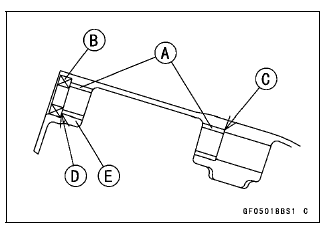
- Install the needle bearings so that the manufacture's mark face out.
- Install the needle bearings [A] and oil seal [B] position as shown in
the figure.
Press the needle bearing until the bottom [C].
Press the needle bearing so that the bearing surface [D]
is flush with the housing end of clutch cover [E].
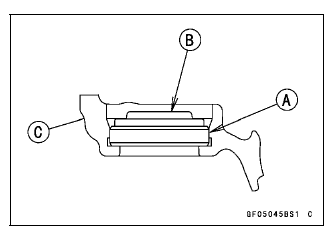
- Apply water to the rubber portion [A] of the oil level gauge.
- Press the gauge until the bottom so that its projection [B] faces inside of the clutch cover [C].
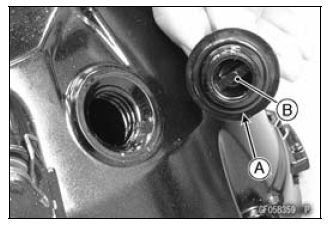
- Replace the O-ring [A] of the oil filler plug [B] with a new one.
- Apply grease to the O-ring.
- Tighten:
Torque - Oil Filler Plug: 2.0 N*m (0.20 kgf*m, 18 in*lb)
See also:
 Kawasaki Z1000SX - Service manual > Clutch
Exploded View
Kawasaki Z1000SX - Service manual > Clutch
Remove: Clutch Cover (see Clutch Cover Removal) Clutch Spring Bolts [A] Clutch Springs Clutch Spring Plate [B] (with Washer, Needle Bearing and Pusher [C]) Remove: Friction Plates and Steel Plates Spring and Spring Seat
 Rider's Manual BMW R 1250 GS GSA
 Owner's Manual Harley-Davidson Sportster XL1200X Forty-Eight
 Owner's Manual Honda CBR650R
 Service manual Honda CBR650
 Owner's Manual Honda PCX125
 Owner's Manual Kawasaki Z1000SX
 Service manual Kawasaki Z1000SX
 Owner's Manual Lexmoto Echo
 Owner's Manual Royal Enfield Interceptor 650
 Service manual Royal Enfield Interceptor 650
 Owner's Manual Yamaha MT-07