 Kawasaki Z1000SX - Service manual > Electric Starter System
Starter Motor Removal
NOTICE Do not tap the starter motor shaft or body. Tapping the shaft or body could damage the motor.
- Drain the coolant (see Coolant Change in the Periodic Maintenance chapter).
- Remove:
Left Lower Fairing (see Lower Fairing Removal in the Frame chapter)
Engine Sprocket Cover (see Engine Sprocket Cover Removal in the Final Drive chapter)
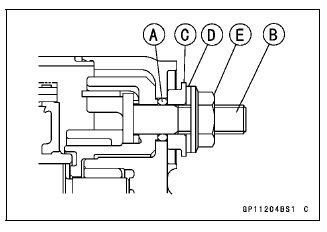
Harness Holder [A] - Loosen the water hose clamp screw [B].
- Remove:
Water Hose [C]
Neutral Switch Connector [D]
Water Pipe Bolt [E]
Water Pipe [F]

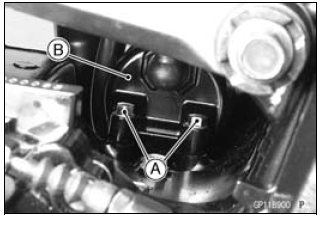
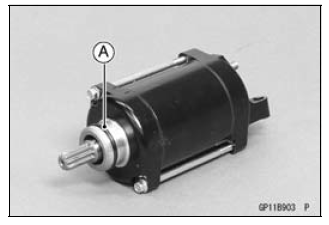
- Remove the starter motor cable [A] from the cable holder [B].

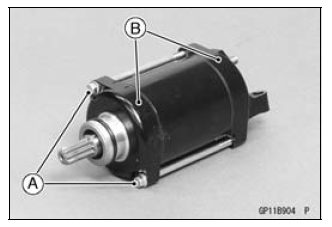
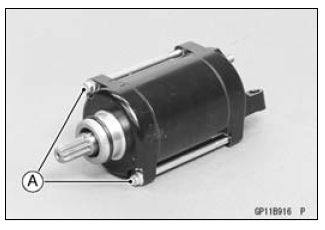
- Remove the mounting bolts [A].
- Pull out the starter motor [B] with the cable connected.
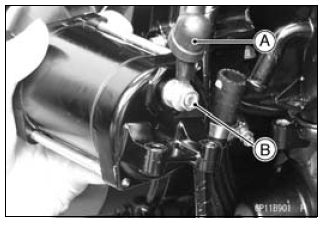
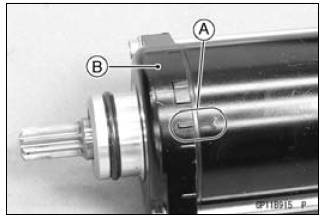
- Slide the rubber cap [A].
- Remove the starter motor cable terminal nut [B] and cable.
Starter Motor Installation
NOTICE Do not tap the starter motor shaft or body. Tapping the shaft or body could damage the motor.
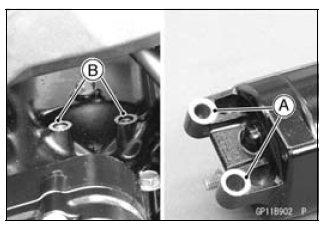
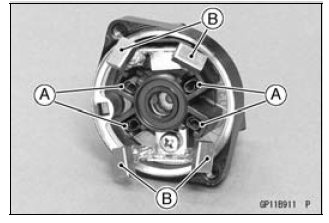
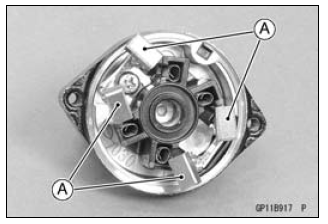
- When installing the starter motor, clean the starter motor legs [A] and crankcase [B] where the starter motor is grounded.
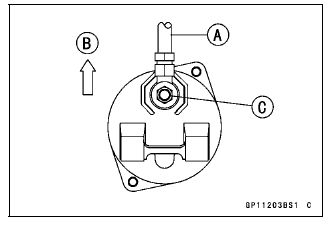
- Install the starter motor cable [A] as shown.
[B] Upward
- Tighten:
Torque - Starter Motor Cable Terminal Nut [C]: 5.9 N*m(0.60 kgf*m, 52 in*lb) - Slide back the rubber cap to the original position.
- Replace the O-ring [A] with a new one.
- Apply grease to the O-ring.
- Tighten:
Torque - Starter Motor Mounting Bolts: 9.8 N*m (1.0 kgf*m, 87 in*lb) - Install the water hose and pipe (see Water Pump Installation in the Cooling System chapter).
Starter Motor Disassembly
- Remove the starter motor (see Starter Motor Removal).
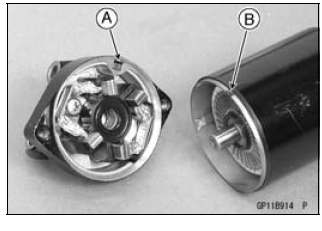
- Take off the starter motor through bolts [A] and remove the both end covers [B].
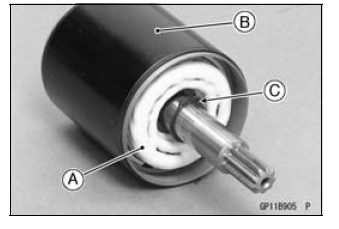
- Pull out the armature [A] out of the yoke [B].
NOTE
- Do not remove the circlip [C] from the shaft.
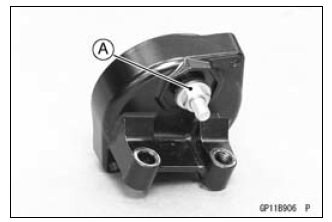
- Remove the starter motor terminal locknut [A].
- Pull out the brushes from the brush holder [A].
- Remove:
Brush Springs [B]
Starter Motor Terminal [C]
Positive Brush Assy [D]
Screw [E]
Negative Brush Assy [F]
Brush Holder
Starter Motor Assembly
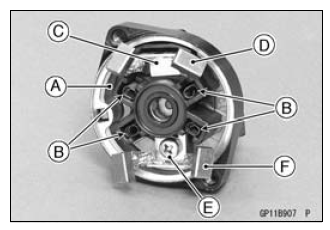
- Align the hole [A] of the brush holder [B] to the boss [C] of the right-hand end cover [D].
- Align the stoppers [A] of the negative brush assy [B] to the guides [C] of the brush holder [D].
- Tighten the screw securely.
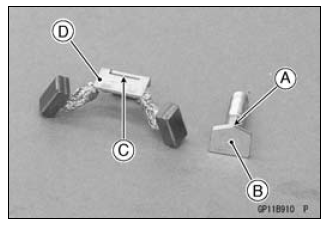
- Insert the jagged porition [A] on the starter motor terminal [B] to the slit [C] on the positive brush assy [D].
- Install the starter motor terminal to the brush holder.
- Replace the O-ring [A] with a new one.
- Install the following parts to the starter motor terminal [B].
New O-ring
Collar [C]
Washer [D]
Starter Motor Terminal Locknut [E]- Install the collar so that stepped side faces outward.
- Tighten:
Torque - Starter Motor Terminal Locknut: 11 N*m (1.1 kgf*m, 97 in*lb)
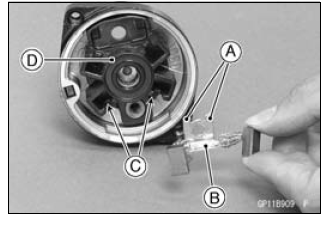
- Install the brush springs [A] and insert the brushes [B].
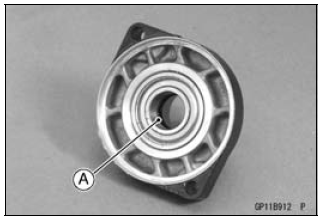
- Apply thin coat of grease to the oil seal [A].
- Replace the O-rings [A] with new ones.
- Insert the armature [B] so that commutator side [C] faces hollow side [D] of the yoke [E].

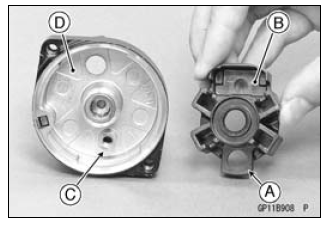
- Align the stopper [A] and hollow [B] to assemble the yoke and end cover.
- Align the marks [A] to assemble the yoke and the end cover [B].
- Tighten:
Torque - Starter Motor Through Bolts [A]: 4.9 N*m (0.50 kgf*m, 43 in*lb)
Brush Inspection
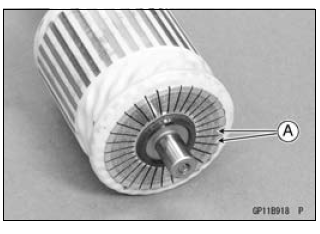
- Measure the length of each brushes [A].
If any is worn down to the service limit, replace the brush assy.
Starter Motor Brush Length
Standard: 12 mm (0.47 in.)
Service Limit: 6.5 mm (0.26 in.)
Commutator Cleaning and Inspection
- Clean the metallic debris off the between commutator segments [A].
NOTE
- Do not use emery or sand paper on the commutator.
- Check the commutator for damage or abnormal wear.
Replace the starter motor with a new one if there is any damage or wear.
- Visually inspect the commutator segments for discoloration.
Replace the starter motor with a new one if discoloration is noticed.
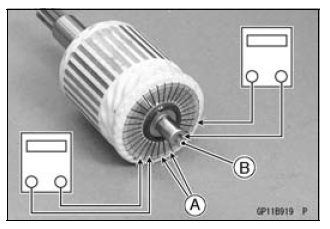
Armature Inspection
- Using the × 1 Ω hand tester range, measure the resistance between any
two commutator segments [A].
Special Tool - Hand Tester: 57001-1394
If there is a high resistance or no reading (∞) between any two segments, a winding is open and the starter motor must be replaced. - Using the highest hand tester range, measure the resistance between the
segments and the shaft [B].
If there is any reading at all, the armature has a short and the starter motor must be replaced.
NOTE
- Even if the foregoing checks show the armature to be good, it may be defective in some manner not readily detectable with the hand tester. If all other starter motor and starter motor circuit components check good, but the starter motor still does not turn over or only turns over weakly, replace the starter motor with a new one.
Brush Lead Inspection
- Using the × 1 Ω hand tester range, measure the resistance as shown.
Right-hand End Cover and Negative Brushes [A]
Terminal Bolt and Positive Brushes [B]
Special Tool - Hand Tester: 57001-1394
If there is not close to zero ohms, the brush lead has an open. Replace the brush plate assy.
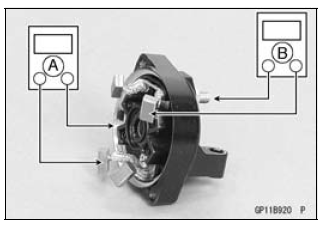
Right-hand End Cover Inspection
- Using the highest hand tester range, measure the resistance as shown.
Terminal Bolt and Right-hand End Cover [A]
Terminal Bolt and Negative Brushes [B]
Special Tool - Hand Tester: 57001-1394
If there is any reading, the brush assy and/or terminal bolt assy have a short. Replace the starter motor.

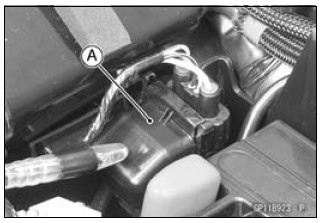
Starter Relay Inspection
- Remove:
Battery Negative (-) Cable (see Battery Removal) - Remove the cable terminal cover [A].
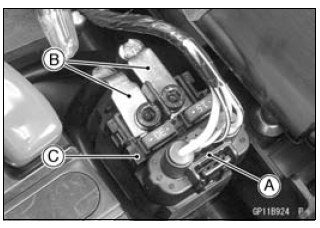
- Disconnect:
Connector [A]
Cable Terminals [B] - Remove:
Starter Relay [C]
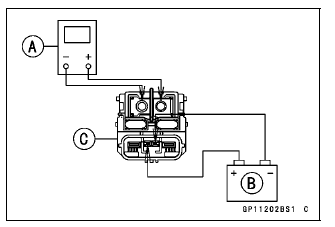
- Connect the hand tester [A] and 12 V battery [B] to the starter relay
[C] as shown in the figure.
Special Tool - Hand Tester: 57001-1394
If the relay does not work as specified, the relay is defective.Replace the relay.
Testing Relay
Tester Range: × 1 Ω range
Criteria:
When battery is connected → 0 Ω
When battery is disconnected → ∞ Ω
Electric Starter Circuit
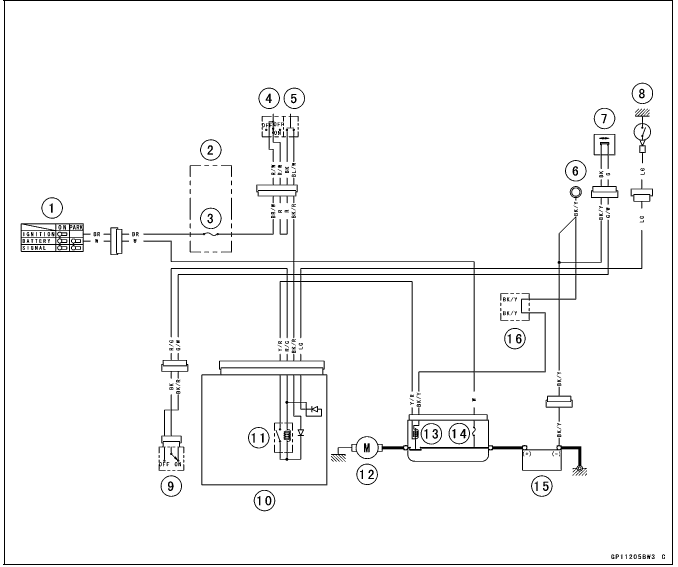
- Ignition Switch
- Fuse Box 2
- Ignition Fuse 15 A
- Engine Stop Switch
- Starter Button
- Frame Ground
- Sidestand Switch
- Neutral Switch
- Starter Lockout Switch
- Relay Box
- Starter Circuit Relay
- Starter Motor
- Starter Relay
- Main Fuse 30 A
- Battery 12 V 8 Ah
- Water-proof Joint B
See also:
 Kawasaki Z1000SX - Service manual > Spark Plug Condition Inspection
Remove the spark plugs (see Spark Plug Replacement). Visually inspect the spark plugs. If the spark plug center electrode [A] and/or side electrode [B] are corroded or damaged, or if the insulator [C] is cracked, replace the plug.
Kawasaki Z1000SX - Service manual > Lighting System
This motorcycle adopt the daylight system and have a headlight relay in the relay box. The headlight does not go on when the ignition switch and the engine stop switch are first turned on. The headlight comes on after the starter button is released and stays on until the ignition switch is turned off. The headlight will go out momentarily whenever the starter button is pressed and come back on when the button is released.
 Rider's Manual BMW R 1250 GS GSA
 Owner's Manual Harley-Davidson Sportster XL1200X Forty-Eight
 Owner's Manual Honda CBR650R
 Service manual Honda CBR650
 Owner's Manual Honda PCX125
 Owner's Manual Kawasaki Z1000SX
 Service manual Kawasaki Z1000SX
 Owner's Manual Lexmoto Echo
 Owner's Manual Royal Enfield Interceptor 650
 Service manual Royal Enfield Interceptor 650
 Owner's Manual Yamaha MT-07