 Kawasaki Z1000SX - Service manual > Spark Plug Condition Inspection
- Remove the spark plugs (see Spark Plug Replacement).
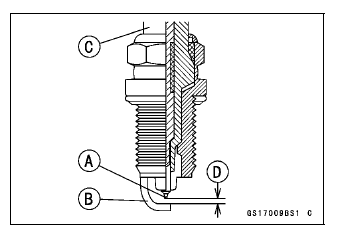
- Visually inspect the spark plugs.
If the spark plug center electrode [A] and/or side electrode [B] are corroded or damaged, or if the insulator [C] is cracked, replace the plug.
If the spark plug is dirtied or the carbon is accumulated, replace the spark plug.
- Measure the gap [D] with a wire-type thickness gauge.
If the gap is incorrect, replace the spark plug.
Spark Plug Gap: 0.8 - 0.9 mm (0.031 - 0.035 in.)
- Use the standard spark plug or its equivalent.
Spark Plug: NGK CR9EIA-9
Interlock Operation Inspection
- Raise the rear wheel off the ground with stand.
- Turn the engine stop switch ON (run position).
1st Check
- Start the engine to the following conditions.
Condition:
Transmission Gear → 1st Position
Clutch Lever → Release
Sidestand → Down or Up
- Turn the ignition switch ON and push the starter button.
- Then the starter motor should not turn when the starter system circuit is normality.
If the engine is start, inspect the starter lockout switch, sidestand switch, neutral switch and relay box.
2nd Check
- Start the engine to the following conditions.
Condition:
Transmission Gear → 1st Position
Clutch Lever → Pulled in
Sidestand → Up
- Turn the ignition switch ON and push the starter button.
- Then the starter motor should turn when the starter system circuit is normality.
If the starter motor is not turn, inspect the starter lockout switch, sidestand switch, relay box, and starter relay.
3rd Check
- Inspect the engine for its secure stop after the following operations are completed.
- Run the engine to the following conditions.
Condition:
Transmission Gear → 1st Position
Clutch Lever → Pulled in
Sidestand → Up
- Set the sidestand on the ground, then the engine will stop.
If the engine does not stop, inspect the neutral switch, sidestand switch and relay box.
If their parts are normality, replace the ECU.
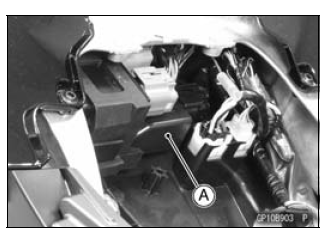
IC Igniter Inspection
- The IC igniter is built in the ECU [A].
- Refer to the following items.
Interlock Operation Inspection (see Interlock Operation Inspection)
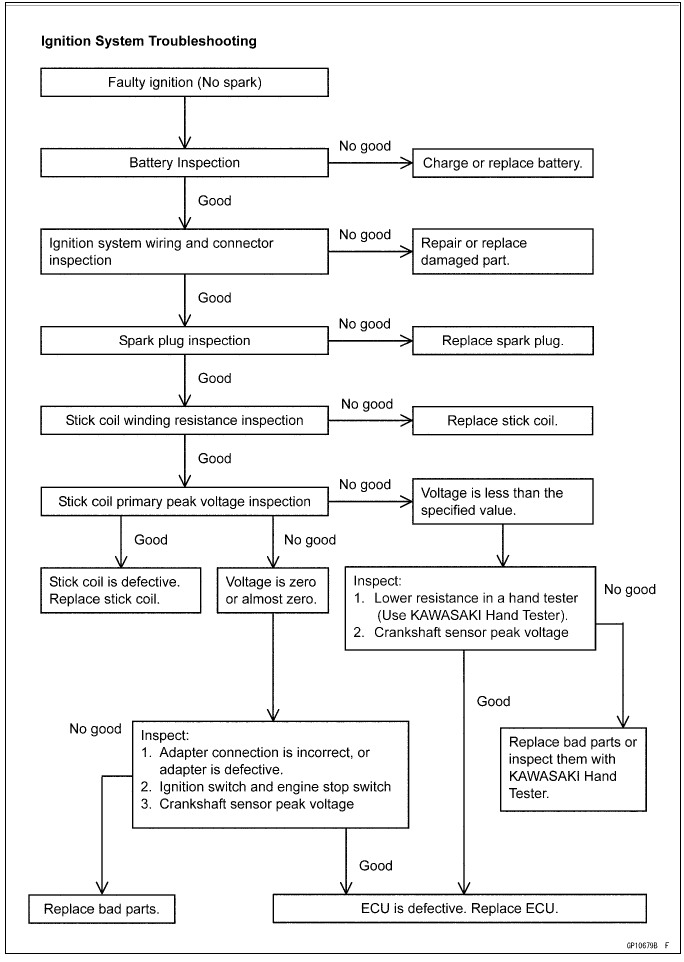
Ignition System Troubleshooting (see Ignition System section)
ECU Power Supply Inspection (see ECU Power Supply Inspection in the Fuel System (DFI) chapter)
Ignition System
Ignition System Circuit
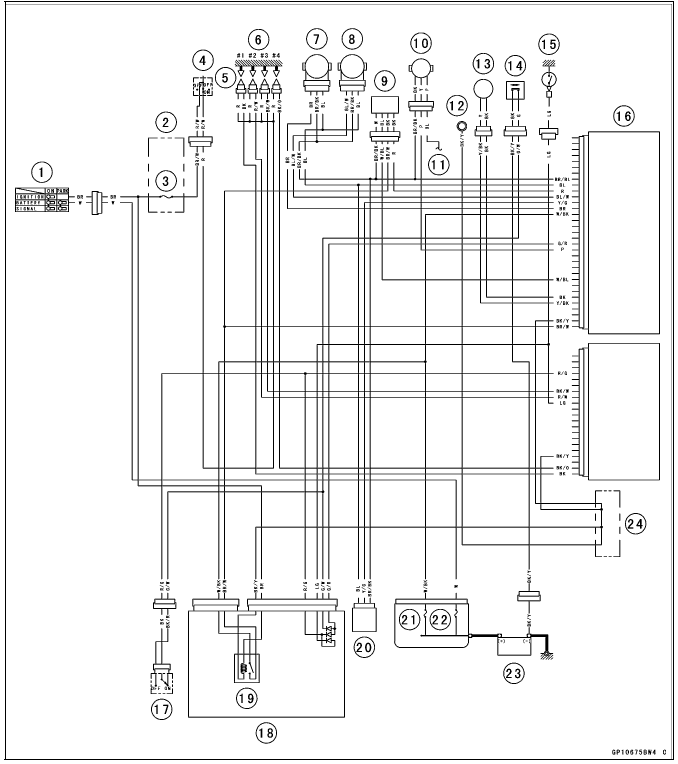
- Ignition Switch
- Fuse Box 2
- Ignition Fuse 15 A
- Engine Stop Switch
- Stick Coils
- Spark Plugs
- Subthrottle Sensor
- Main Throttle Sensor
- Oxygen Sensor (Equipped Models)
- Speed Sensor
- to Meter Unit
- Frame Groun
- Crankshaft Sensor
- Sidestand Switch
- Neutral Switch
- ECU
- Starter Lockout Switch
- Relay Box
- ECU Main Relay
- Vehicle-down Sensor
- FI Fuse 15 A
- Main Fuse 30 A
- Battery 12 V 8 Ah
- Water-proof Joint C
See also:
 Kawasaki Z1000SX - Service manual > Timing Rotor Removal
Remove the crankshaft sensor (see Crankshaft Sensor Removal). Remove the timing rotor [A]. Holding the timing rotor with the flywheel & pulley holder [B] and remove the rotor bolt [C].
Kawasaki Z1000SX - Service manual > Electric Starter System
Starter Motor Removal NOTICE Do not tap the starter motor shaft or body. Tapping the shaft or body could damage the motor. Drain the coolant (see Coolant Change in the Periodic Maintenance chapter). Remove: Left Lower Fairing (see Lower Fairing Removal in the Frame chapter) Engine Sprocket Cover (see Engine Sprocket Cover Removal in the Final Drive chapter) Harness Holder [A] Loosen the water hose clamp screw [B]. Remove: Water Hose [C] Neutral Switch Connector [D] Water Pipe Bolt [E] Water Pipe [F] Remove the starter motor cable [A] from the cable holder [B]. Remove the mounting bolts [A]. Pull out the starter motor [B] with the cable connected. Slide the rubber cap [A]. Remove the starter motor cable terminal nut [B] and cable.
 Rider's Manual BMW R 1250 GS GSA
 Owner's Manual Harley-Davidson Sportster XL1200X Forty-Eight
 Owner's Manual Honda CBR650R
 Service manual Honda CBR650
 Owner's Manual Honda PCX125
 Owner's Manual Kawasaki Z1000SX
 Service manual Kawasaki Z1000SX
 Owner's Manual Lexmoto Echo
 Owner's Manual Royal Enfield Interceptor 650
 Service manual Royal Enfield Interceptor 650
 Owner's Manual Yamaha MT-07