 Honda CBR650 - Service manual > Front wheel
REMOVAL/INSTALLATION
NOTE:
- Do not operate the brake lever after removing the wheel.
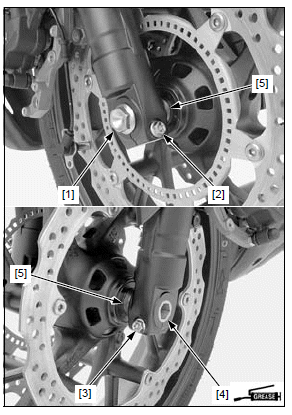
Remove the right and left front brake calipers.
Remove the axle bolt [1] and loosen the right [2] and left [3] axle pinch bolts.
Support the motorcycle securely using a hoist or equivalent and raise the front wheel off the ground.
Pull the axle [4] out and remove the front wheel.
Remove the side collars [5].
Install the side collars.
Coat the axle surface with thin layer of grease.
Place the wheel between the fork legs.
Insert the axle from the left side until its end is flush with the outer surface of the left fork leg.
Hold the axle and tighten the axle bolt to the specified torque.
TORQUE:59 N*m (6.0 kgf*m, 44 lbf*ft)
Tighten the right axle pinch bolts to the specified torque.
TORQUE:22 N*m (2.2 kgf*m, 16 lbf*ft)
Install the right and left front brake calipers.
With the front brake applied, pump the forks up and down several times to seat the axle and check the brake operation.
Tighten the left axle pinch bolt to the specified torque.
TORQUE: 22 N*m (2.2 kgf*m, 16 lbf*ft)
INSPECTION
Turn the inner race of each bearing with your finger.
The bearings should turn smoothly and quietly. Also check that the bearing outer race fits tightly in the hub.
Replace the bearings if they do not turn smoothly, quietly, or if they fit loosely in the hub.
Inspect the following parts for damage, abnormal wear, deformation or bend.
- Front axle
- Wheel hub
- Wheel rim
Measure each part according to FRONT WHEEL/ SUSPENSION/STEERING SPECIFICATIONS.
Replace any part if it is out of service limit.
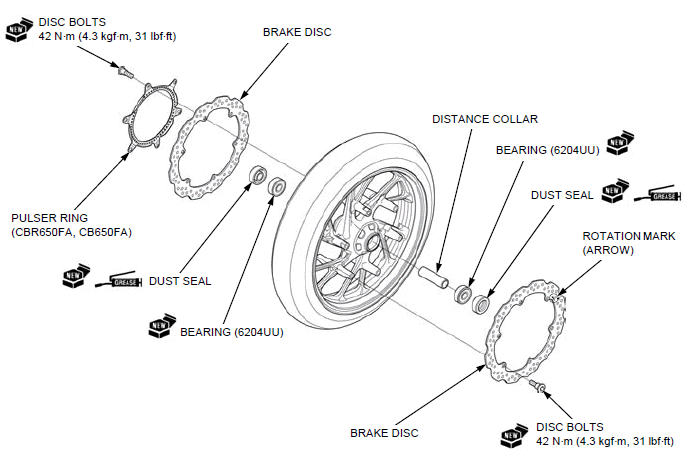
DISASSEMBLY/ASSEMBLY
Disassemble and assemble the front wheel as following illustration.
- Install each dust seal with the flat side facing out so that it is flush with the wheel hub.
- Install the brake disc with the rotation mark (arrow) facing out.
BEARING REPLACEMENT
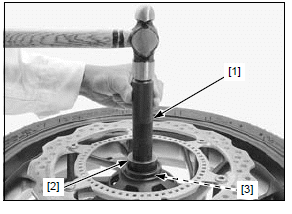
Install the remover head [1] into the bearing.
From the opposite side of the wheel, install the bearing remover shaft [2] and drive the bearing out of the wheel hub.
TOOLS:
[1] Bearing remover head, 20 mm 07746-0050600
[2] Bearing remover shaft 07746-0050100
Remove the distance collar and drive out the other bearing.
Drive in a new right side bearing squarely with the marked side facing up until it is fully seated.
Install the distance collar.
Drive in a new left side bearing squarely with the marked side facing up until it is fully seated.
TOOLS:
[1] Driver 07749-0010000
[2] Attachment, 42 x 47 mm 07746-0010300
[3] Pilot, 20 mm 07746-0040500
WHEEL BALANCE
NOTE:
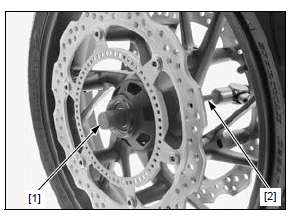
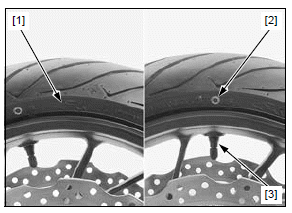
- Mount the tire with the arrow mark [1] facing in the direction of rotation.
- For optimum balance, the tire balance mark [2] (light mass point: a paint dot on the side wall) must be located next to the valve stem [3]. Remount the tire if necessary.
- The wheel balance must be checked when the front tire is remounted.
- Stick-type balance weights should be used on this motorcycle. Use
genuine Honda balance weights.
- Before installing the weights, remove any adhesive from the rim thoroughly and clean the area where new weights are to be placed with degreasing agent. Take care not to scratch the rim surface.
- Do not touch the adhesive surface of the weight with your bare hands when installing.
- The balance weights are always replaced with new ones whenever they are removed. Do not reuse them.
Mount the wheel, tire and brake disc assembly on an inspection stand [1].
Spin the wheel, allow it to stop, and mark the lowest (heaviest) part of the wheel with chalk.
Do this two or three times to verify the heaviest area.
If the wheel is balanced, it will not stop consistently in the same position.
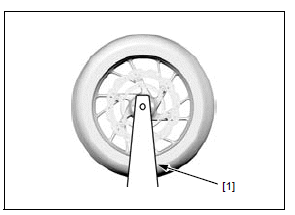
To balance the wheel, install the wheel weights [1] on the highest side of the rim, on the side opposite the chalk marks. Add just enough weight so the wheel will no longer stop in the same position when it is spun.
Do not add more than 60 g (2.1 oz) to the wheel.
Press the weights by your hands firmly and make sure they are not come off the rim.
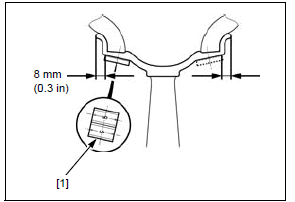
NOTE:
- The weights are attached to the position at 8 mm (0.3 in) from the side surface of the rim in the direction as shown.
- If the weight exceeds 10 g (0.4 oz), install same amount of the balance weights on the right and left symmetrical position.
See also:
 Honda CBR650 - Service manual > Handlebar
REMOVAL (CBR650F/FA) LEFT HANDLEBAR Remove the following: Clutch switch connectors [1] Two bolts [2] Bracket holder [3] Clutch lever bracket [4] Two screws [1] Left handlebar switch housings [2] Stopper ring [1] Pinch bolt [2] (loosen) Left handlebar [3]
Honda CBR650 - Service manual > Fork
REMOVAL (CBR650F/FA) Remove the following: Front wheel Front fender Remove the wire band [1] from the left fork pipe.
 Rider's Manual BMW R 1250 GS GSA
 Owner's Manual Harley-Davidson Sportster XL1200X Forty-Eight
 Owner's Manual Honda CBR650R
 Service manual Honda CBR650
 Owner's Manual Honda PCX125
 Owner's Manual Kawasaki Z1000SX
 Service manual Kawasaki Z1000SX
 Owner's Manual Lexmoto Echo
 Owner's Manual Royal Enfield Interceptor 650
 Service manual Royal Enfield Interceptor 650
 Owner's Manual Yamaha MT-07