 Honda CBR650 - Service manual > Gearshift linkage
REMOVAL
Remove the clutch.
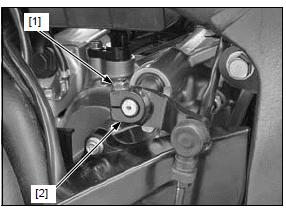
Remove the pinch bolt [1] and disconnect the gearshift arm [2] from the gearshift spindle.
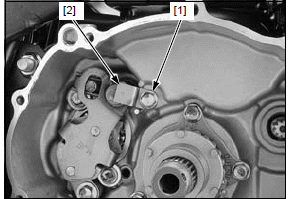
Remove the bolt [1] and setting plate [2].
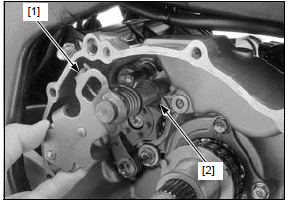
Pull the gearshift spindle assembly [1] and thrust washer [2] out of the crankcase.
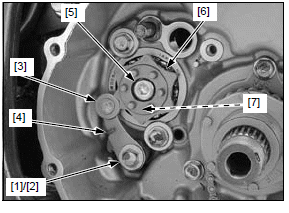
Remove the following:
- Stopper arm pivot bolt [1]
- Washer [2]
- Stopper arm [3]
- Return spring [4]
- Shift drum center socket bolt [5]
- Gearshift cam [6]
- Dowel pin [7]
INSPECTION
Inspect the following parts for scratch, damage, abnormal wear and deformation.
- Shift drum stopper plate
- Shift drum stopper arm
- Shift drum stopper arm return spring
Replace if necessary.
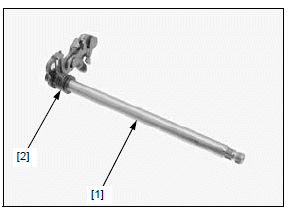
Check the gearshift spindle [1] for wear, damage or bending.
Check the return spring [2] for fatigue or damage.
GEARSHIFT SPINDLE NEEDLE BEARING REPLACEMENT
Remove the gearshift spindle.
Remove the bolt [1], gearshift spindle oil seal setting plate [2], oil seal [3] and needle bearing [4].
Apply engine oil to a new gearshift spindle needle bearing, then install it into the crankcase.
Apply grease to a new oil seal lips, then install it into the crankcase until it is flush with the crankcase surface.
Apply locking agent to the gearshift spindle oil seal setting plate bolt threads.
Install the gearshift spindle oil seal setting plate between the crankcase tabs [5], then tighten the bolt.
INSTALLATION
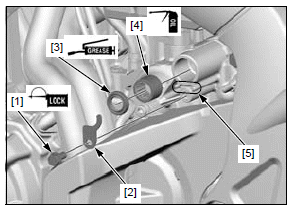
Apply a locking agent to the stopper arm pivot bolt [1] threads.
Install the following:
- Return spring [2]
- Washer [3]
- Stopper arm [4]
- Pivot bolt
- Align the stopper arm groove with the spring end.
Tighten the stopper arm pivot bolt to the specified torque.
TORQUE:12 N*m (1.2 kgf*m, 9 lbf*ft)
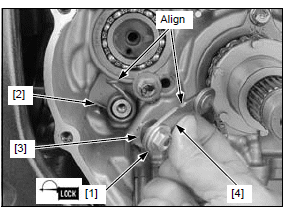
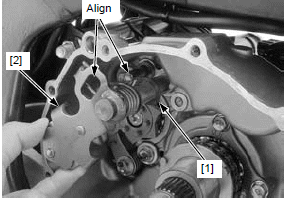
Install the dowel pin [1] onto the shift drum.
Align the dowel pin on the shift drum with the wide groove on the gearshift cam.
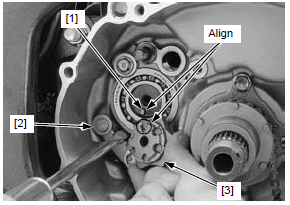
Hold the stopper arm [2] using a screwdriver as shown.
Install the gearshift cam [3] while aligning its slot with the dowel pin.
Apply a locking agent to the shift drum center socket bolt [1] threads.
Tighten the socket bolt to the specified torque.
TORQUE:23 N*m (2.3 kgf*m, 17 lbf*ft)

Install the thrust washer [1] and gearshift spindle assembly [2] into the crankcase while aligning the return spring ends with the crankcase stopper pin.
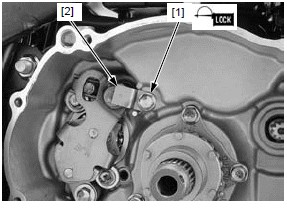
Apply a locking agent to the setting plate bolt [1] threads.
Install the setting plate [2] and tighten the bolt securely.
Install the gearshift arm [1] to the gearshift spindle by aligning the arm slit with the punch mark on the gearshift spindle.
Install and tighten the pinch bolt [2].
Install the clutch.

GEARSHIFT PEDAL REMOVAL/ INSTALLATION
Remove the pinch bolt [1] and gearshift arm [2] from the gearshift spindle.
Remove the pivot socket bolt [3] and gearshift pedal [4].
Remove the dust seals [5].
Check the dust seals and tie-rod ball joint dust cover [6] for deterioration or damage, replace them if necessary.
Installation is in the reverse order of removal.
TORQUE:
Gearshift pedal pivot socket bolt:
27 N*m (2.8 kgf*m, 20 lbf*ft)
NOTE:
- Apply grease to the dust seal lips.
- Install the dust seals with the seal lip side facing out.
- Apply grease to the gearshift pedal pivot sliding area (grease groove) of the pivot bolt.
- Apply grease to the gearshift pedal tie-rod ball joint.
- Align the slit of the gearshift arm with the punch mark on the spindle

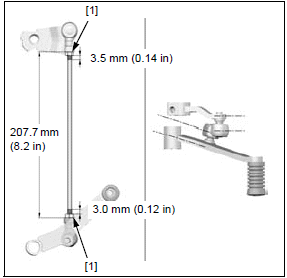
When adjusting the gearshift pedal height, perform by loosing the lock nuts [1] and it must be noted as follows.
NOTE:
- The gearshift arm side lock nut has left hand threads.
Adjust the tie-rod length so that the distance between the ball joint ends is standard length as shown.
After adjustment tighten the gearshift pedal adjuster lock nuts to the specified torque.
TORQUE:10 N*m (1.0 kgf*m, 7 lbf*ft)
NOTE:
- Tighten the lock nuts with the position of each ball joint in parallel to the gearshift arm and gearshift pedal as shown.
See also:
 Honda CBR650 - Service manual > Starter clutch
REMOVAL Remove the clutch. Remove the starter reduction gear [1] from the crankcase.
 Rider's Manual BMW R 1250 GS GSA
 Owner's Manual Harley-Davidson Sportster XL1200X Forty-Eight
 Owner's Manual Honda CBR650R
 Service manual Honda CBR650
 Owner's Manual Honda PCX125
 Owner's Manual Kawasaki Z1000SX
 Service manual Kawasaki Z1000SX
 Owner's Manual Lexmoto Echo
 Owner's Manual Royal Enfield Interceptor 650
 Service manual Royal Enfield Interceptor 650
 Owner's Manual Yamaha MT-07