 Royal Enfield Interceptor 650 - Service manual > Mudguards/Number Plates/Grab Handle
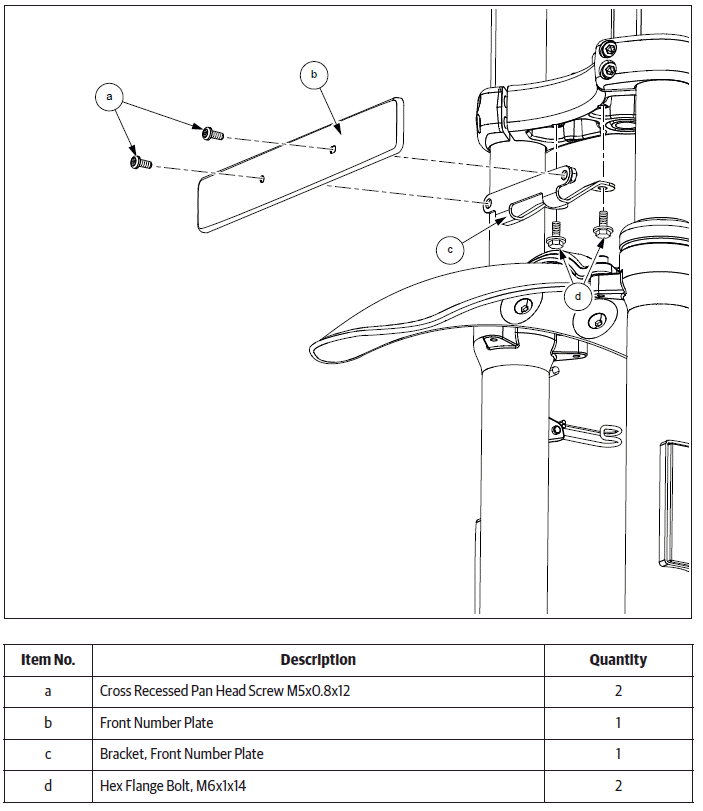
Front Number Plate
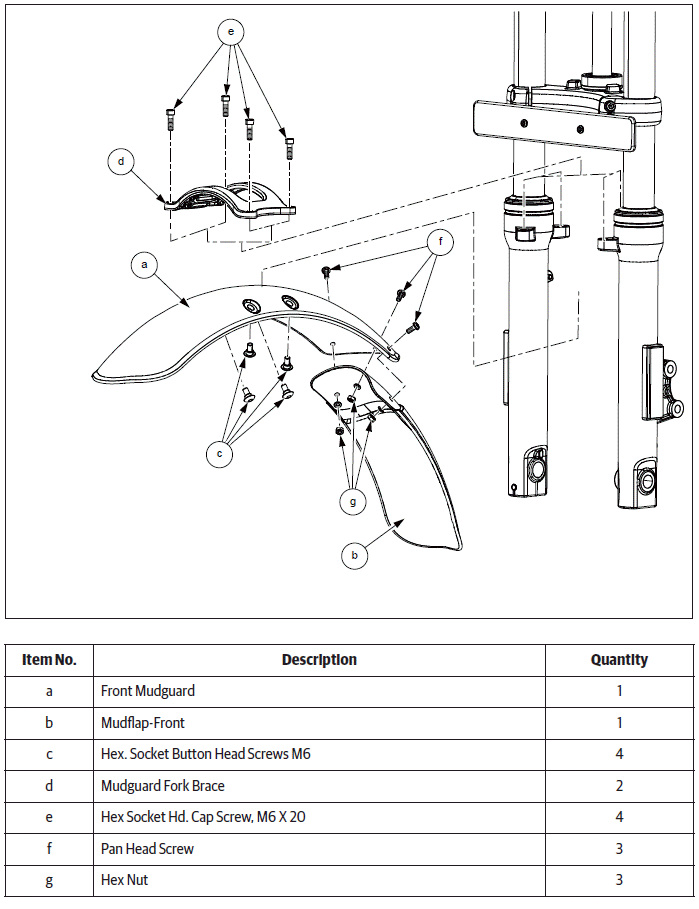
Front Mudguard
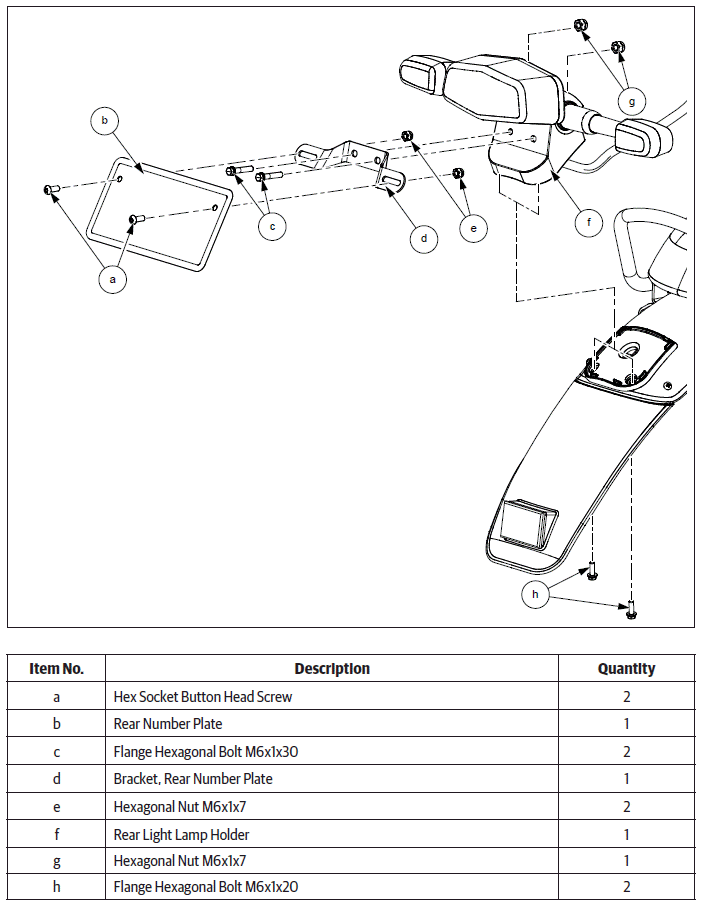
Rear Number Plate
Rear Mudguard/Reflector/ Grab Handle

Dismantling
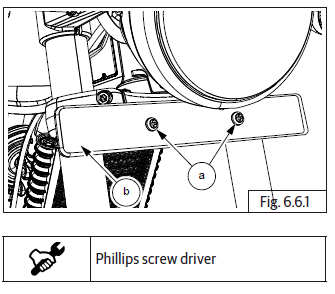
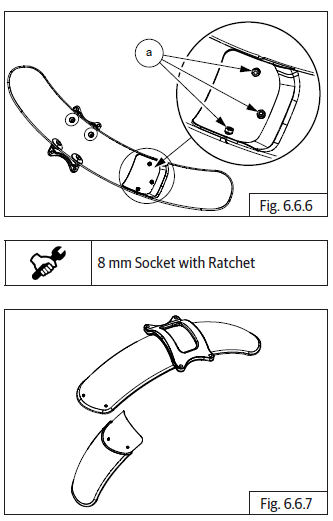
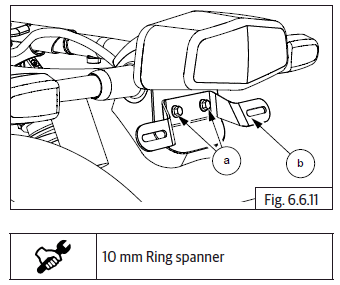
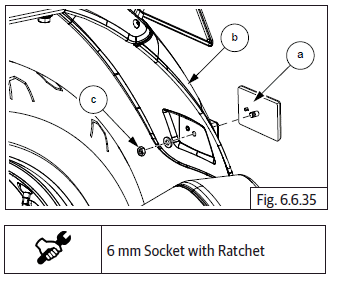
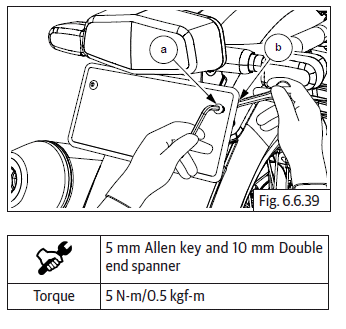
Front Number Plate (Only for India)
- Loosen and remove 2 Nos. Phillips head screws (a) holding number plate (b) from bracket.
- Remove number plate.
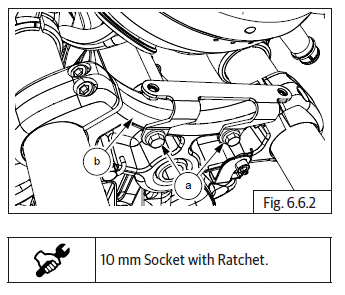
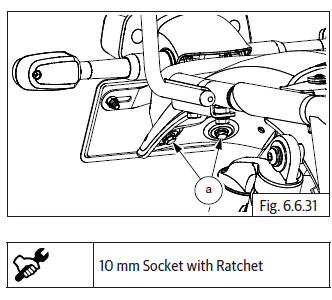
- Loosen and remove 2 Nos. Hex flange bolts (M6) (a) holding number plate bracket from steering stem assembly (b).
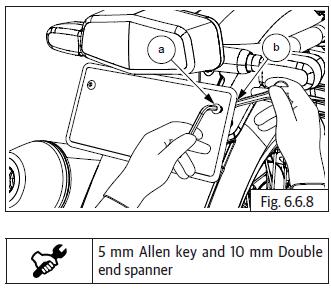
Front Mudguard
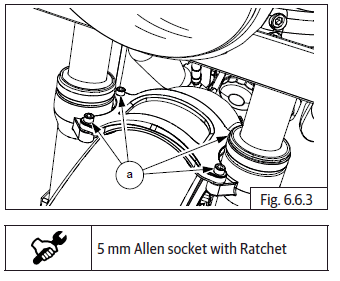
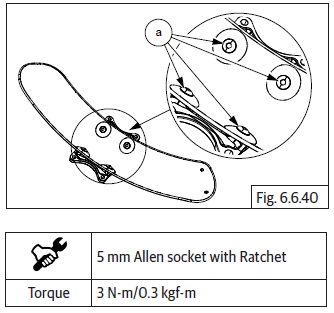
- Loosen and remove 4 Nos. Hex flange bolts (M6) (a) from fork brace.
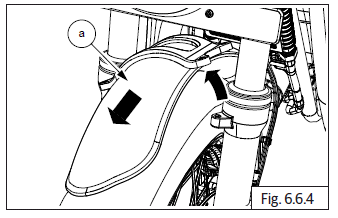
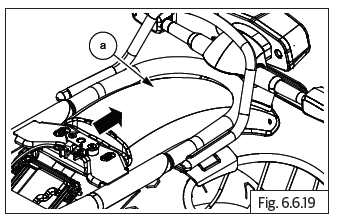
- Slightly lift mudguard (a) upwards, tilt it to one side and remove from fork ends.
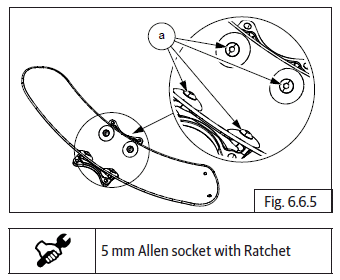
- Loosen and remove 4 Nos. Hex socket button head screws (M6) (a) and separate fork brace from mudguard.
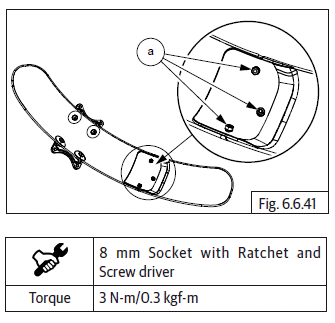
- Loosen and remove 3 Nos. Hex nuts (M6) (a) to separate mudflap from mudguard.
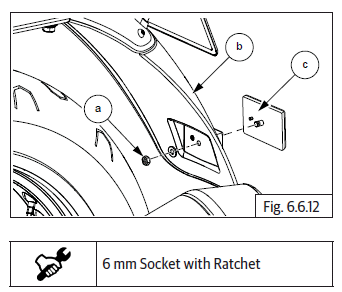
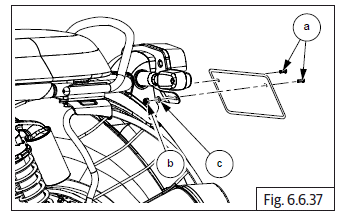
Rear Number Plate (Only for India)
- Hold pan head screw (M5) (a) and remove Hex nut (M6) (b) (located behind rear number plate bracket) along with washer.
- Repeat above procedure for pan head screw (a) and Hex nut (b) on other side of number plate.
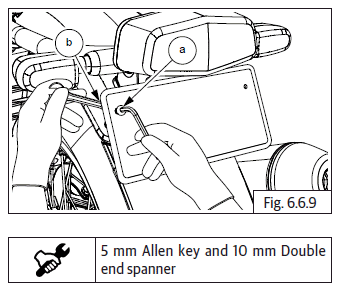
- Support number plate suitably while removing screws.
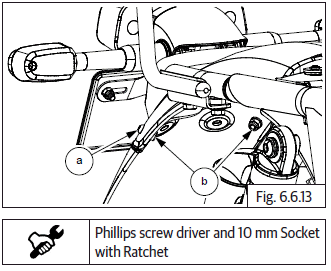
Rear Number Plate Bracket
- Remove rear mudguard.
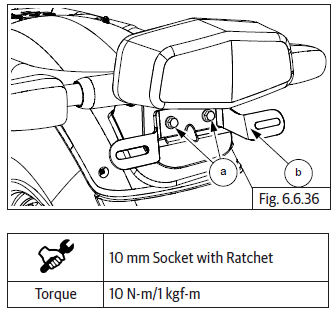
- Hold Hex nut (M6) (a) inside tail lamp bracket (b).
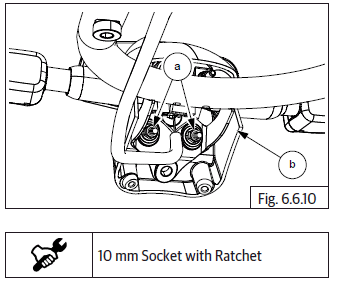
- Loosen 2 Nos. Hex flange head bolts (M6) (a) on number plate bracket (b).
- Support the bracket while removing the bolts.
Reflector Rear
- Loosen and remove Hex nut (M4) (a) along with washer from rear mudguard bottom (b) to remove rear reflector (c).
Rear Mudguard
- Remove the following:
- Side panel RH.
- Rider seat.
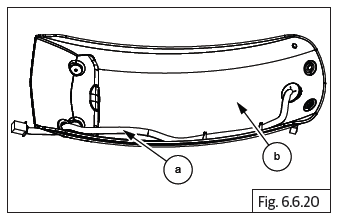
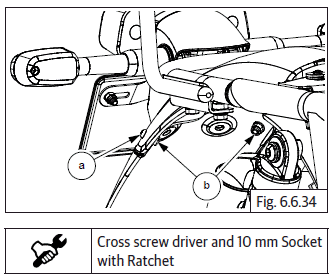
- Hold Phillips screw (a), loosen and remove 2 Nos. Hex nuts (M6) (b) to remove mudflap from rear mudguard.
- Remove rear mudflap (a) from rear mudguard (b).
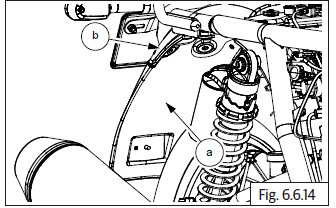
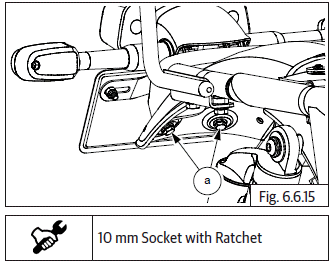
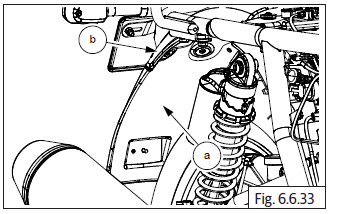
- Loosen and remove 2 Nos. Hex flange bolts (M6) (a) from inner side of rear mudguard.
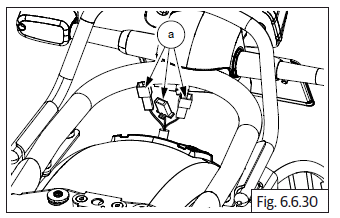
- Disconnect tail lamp and trafficator connectors (a) from wiring harness located behind tail lamp assembly.
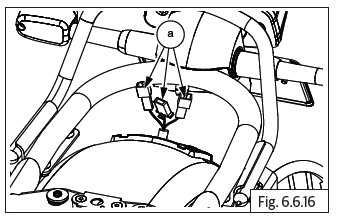
- Disconnect rear harness (a) from main wiring harness.
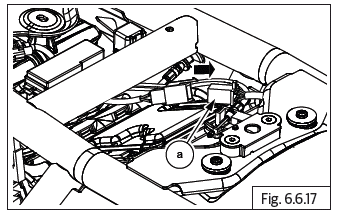
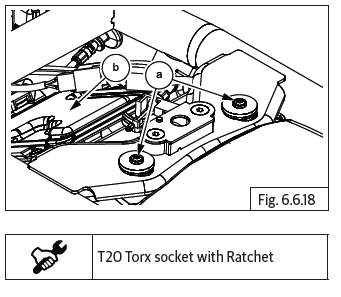
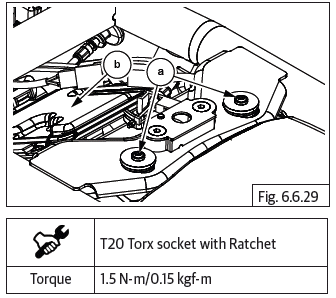
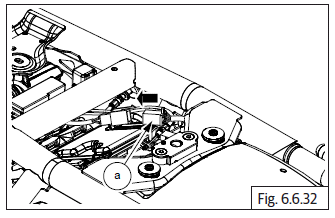
- Loosen and remove 2 Nos. self-tapper screws (T20) (a) along with washers from frame behind engine control unit (ECU) (b).
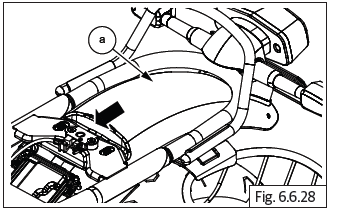
- Remove rear mudguard (a) from frame.
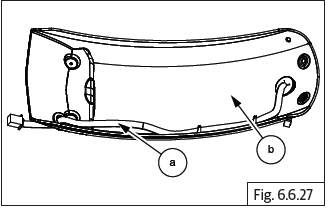
- Remove tail lamp wiring harness (a) from rear mudguard (b).
Rear Mudguard Infill Cover
- Remove the following parts:
- Side panel RH.
- Rider seat.
- Rear wheel.
- Engine control unit (ECU).
CAUTION Before disconnecting ECU from the wiring harness, the battery terminals must be disconnected from the battery.
- Roll over sensor.
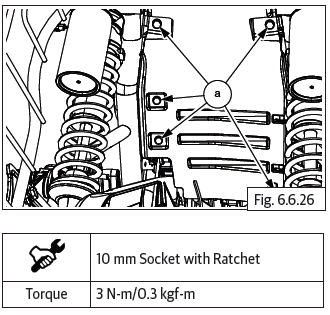
- Loosen and remove 5 Nos. Hex socket head bolts (M6) (a) and remove the rear mudguard infill cover.
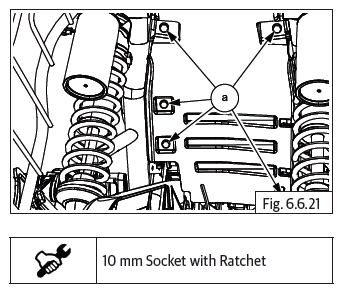
CAUTION For Interceptor models: Support the rear brake master cylinder reservoir along with clamp carefully while removing Hex socket bolt at the bottom RH side of the mudguard infill cover.
Grab Handle
- Remove side panel RH.
- Remove rider seat.
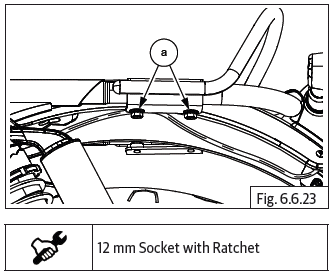
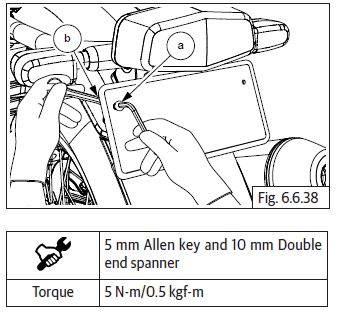
- Loosen and remove 2 Nos. Hex flange bolts (M8) (a) RH from frame.
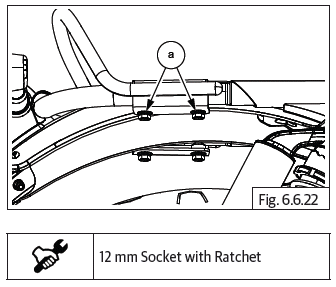
- Loosen and remove 2 Nos. Hex flange bolts (M8) (a) LH from frame.
Inspection
Mudguard/Reflector/Grab handle
- Clean Mudguard. Inspect for any scratches, cracks, damages on mudguard and replace if required.
- Inspect rear reflector for any cracks or damages. Replace if required.
- Inspect grab handle for any cracks, bends or damages and replace if required.
Front and Rear number plates
- Inspect number plates and bracket for rust formation and cracks. Replace if required.
Assembly
Grab Handle
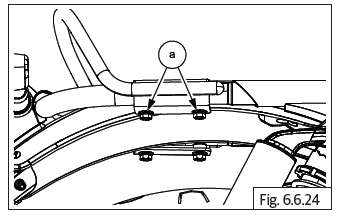
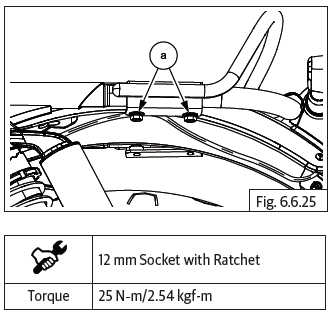
- Locate grab handle on frame and ensure the mounting holes are aligned.
- Tighten grab handle on frame using 4 Nos. Hex flange bolts (M8) (a).
Rear Mudguard Infill Cover
- Locate and align rear mudguard infill cover into frame.
- For Interceptor models: Locate the rear brake master cylinder reservoir clamp on the bottom RH side of the infill cover and ensure the mounting holes are aligned.
- Locate and tighten 5 Nos. Hex socket head bolts (M6) (a) and fix the rear mudguard infill cover.
Rear Mudguard
CAUTION DO NOT over tighten bolts and nuts as it may crack or break the plastic parts and cause vibration and noise while driving.
- Route the tail lamp wiring harness (a) into rear mudguard (b) and secure with rubber clip.
- Locate the rear mudguard (a) into frame and ensure the mounting holes are aligned.
- Insert and tighten 2 Nos. Torx screws (T20) (a) along with washers into frame bracket (b).
- Hold tail lamp with bracket near rear mudguard, connect tail lamp and trafficator connectors (a) into wiring harness.
- Align tail lamp bracket to the mounting holes in the rear mudguard.
- Insert and tighten 2 Nos. Hex flange bolts (M6) (a) from rear mudguard to fix tail lamp assembly.
- Connect tail lamp connector (a) into wiring harness.
- Assemble rear mudflap (a) onto rear mudguard (b).
- Support cross recessed pan screw (a) with cross screw driver and locate and tighten 2 Nos. Hex nuts (M6) (b).
Reflector
- Locate reflector (a) into rear mudflap guide (b) hole and tighten Hex nut (M4) (c) along with washer.
Rear Number Plate Bracket
- Locate rear number plate bracket in place.
- Locate and tighten 2 Nos. Hex flange head bolts (M6) (a) into rear number plate bracket (b).
Rear Number Plate (Only for India)
- Position rear number plate against bracket and ensure the mounting holes are aligned.
- Insert pan head screw (M6) (a) into the number plate.
- Locate Hex nut (M6) (b) along with washer (c) on pan head screw from inner side of rear mudguard.
- Suitably hold pan head screw (M6) (a) and tighten hex nut (M6) (b).
- Repeat above procedure for fixing other side of number plate with screw (a) and nut (b).
Front Mudguard
NOTE
- Do not over tighten bolts and nuts into mudflaps and mudguards, it may crack or break the plastic parts and cause noise or vibration while driving.
- Locate fork brace onto mudguard and tighten 4 Nos. Hex socket button head screws (M6) (a).
- Locate and tighten 3 Nos. Hex nuts (M6) (a) and attach mudflap to mudguard.
- Ensure handlebar is turned to one side, tilt front mudguard and insert between the fork legs.
- Align mounting holes of the fork brace to mounting holes on fork ends LH and RH.
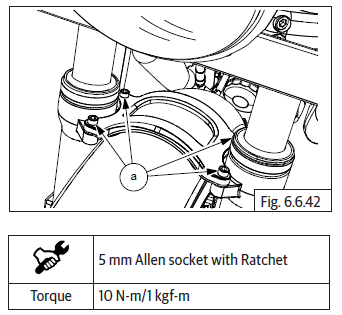
- Locate and tighten 4 Nos. Hex flange bolts (M6) (a) and fix mudguard in to fork.
Front Number Plate (Only for India)
- Locate and tighten 2 Nos. Hex flange bolts (M6) (a) and attach number plate bracket into yoke lower (b).

- Locate and tighten 2 Nos. Pan head screws (M5) (a) into number plate (b).

See also:
 Royal Enfield Interceptor 650 - Service manual > Center Stand
CAUTION Ensure the motorcycle is upright on a firm and flat surface. Ensure motorcycle is supported appropriately. Locate and support center stand in frame. Insert clevis pin (a) from RH side to assemble center stand to frame. Install washer (a) into clevis pin (b). Install split pin (a) into clevis pin and split the outer end to install center stand (b). Install spring (a) into center stand.
 Rider's Manual BMW R 1250 GS GSA
 Owner's Manual Harley-Davidson Sportster XL1200X Forty-Eight
 Owner's Manual Honda CBR650R
 Service manual Honda CBR650
 Owner's Manual Honda PCX125
 Owner's Manual Kawasaki Z1000SX
 Service manual Kawasaki Z1000SX
 Owner's Manual Lexmoto Echo
 Owner's Manual Royal Enfield Interceptor 650
 Service manual Royal Enfield Interceptor 650
 Owner's Manual Yamaha MT-07