 Honda CBR650 - Service manual > Piston/cylinder
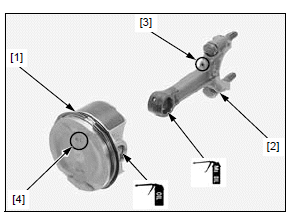
PISTON/CONNECTING ROD REMOVAL
NOTICE
- Before piston removal, place a clean shop towel around the connecting rod to prevent damaging the cylinder sleeve.
- Do not try to remove the piston/connecting rod assembly from bottom of the cylinder; the assembly will get stuck in the gap between the cylinder liner and the upper crankcase.
- Do not interchange the bearing inserts. They must be installed in their original locations or the correct bearing oil clearance may not be obtained, resulting in engine damage.
Remove the following:
- Transmission
- Crankshaft
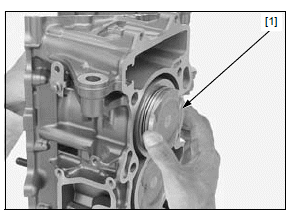
Remove the piston/connecting rod assembly [1] from the top of the cylinder.
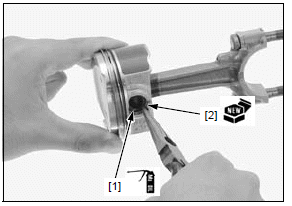
PISTON REMOVAL
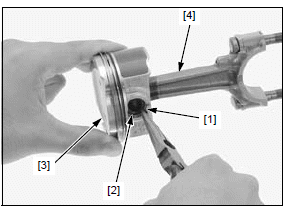
Remove the piston pin clips [1] with pliers.
Push the piston pin [2] out of the piston [3] and connecting rod [4], then remove the piston.
PISTON RING REMOVAL
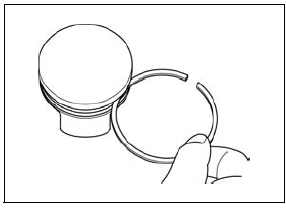
Spread each piston ring ends and remove them by lifting up at a point opposite the gap.
NOTE:
- Do not damage the piston ring by spreading the ends too far.
- Be careful not to damage the piston when removing the piston ring.

Clean carbon deposits from the piston ring grooves with a ring that will be discarded.
NOTE:
- Never use a wire brush; it will scratch the groove.
INSPECTION
Inspect the following parts for scratch, damage, abnormal wear, deformation, burning or clogs in oil passages.
- Cylinder
- Piston
- Piston rings
- Piston pin
- Connecting rod small end
Measure each part and calculate the clearance according to CRANKSHAFT/PISTON/CYLINDER SPECIFICATIONS.
Replace any part if it is out of service limit.
PISTON RING INSTALLATION
Clean the piston ring grooves thoroughly and install the piston rings.
- Apply engine oil to the piston ring entire surface and piston ring grooves.
- Avoid piston and piston ring damage during installation.
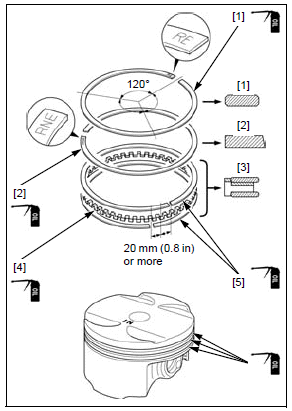
- Install the piston rings with the marked side facing up.
- "RE" mark: top ring [1]
- "RNE" mark: second ring [2]
- To install the oil ring [3], install the spacer [4] first, then install the side rails [5].
Stagger the piston ring end gaps 120º apart from each other.
Stagger the side rail end gaps as shown.
After installation, the rings should rotate freely in the ring groove.
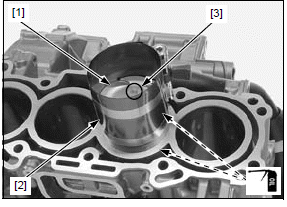
PISTON INSTALLATION
Install the crankpin bearings in the original locations.
Apply engine oil to the piston pin hole inner surface.
Apply molybdenum oil solution to the connecting rod small end inner surface.
Assemble the piston [1] and connecting rod [2] with the oil passage hole [3] facing to the piston "IN" mark [4].
Apply molybdenum oil solution to the piston pin [1] outer surface.
Install the piston pin and secure it using new piston pin clips [2].
NOTE:
- Make sure that the piston pin clips are seated securely.
- Do not align the piston pin clip end gap with the piston cutout.
Apply engine oil to the cylinder inner surface and piston sliding surface.
Install the piston/ connecting rod assembly with the piston "IN" mark [3] facing the intake side.
Install the piston/connecting rod assembly [1] into the cylinder using a commercially available piston ring compressor tool [2].
When reusing the connecting rods, they must be installed in their original locations.
NOTICE
- While installing the piston, be careful not to damage the top surface of the cylinder, especially around the cylinder bore.
- Be careful not to damage the cylinder sleeve and crankpin with the connecting rod.
Make sure the piston ring compressor tool sits flush on the top surface of the cylinder.
Use the handle of a plastic hammer or equivalent tool to tap the piston into the cylinder.
Install the following:
- Crankshaft
- Transmission
See also:
 Honda CBR650 - Service manual > Main journal bearing
NOTICE Do not interchange the bearing inserts. They must be installed in their original locations or the correct bearing oil clearance may not be obtained, resulting in engine damage.
Honda CBR650 - Service manual > Engine removal/installation
Service information GENERAL A hoist or equivalent is required to support the motorcycle when removing and installing the engine. A floor jack or other adjustable support is required to support and maneuver the engine.
 Rider's Manual BMW R 1250 GS GSA
 Owner's Manual Harley-Davidson Sportster XL1200X Forty-Eight
 Owner's Manual Honda CBR650R
 Service manual Honda CBR650
 Owner's Manual Honda PCX125
 Owner's Manual Kawasaki Z1000SX
 Service manual Kawasaki Z1000SX
 Owner's Manual Lexmoto Echo
 Owner's Manual Royal Enfield Interceptor 650
 Service manual Royal Enfield Interceptor 650
 Owner's Manual Yamaha MT-07