 Honda PCX125 - Owner's Manual > Riding, Braking, Parking
Riding
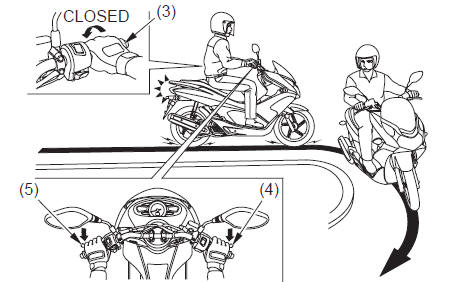
1. To prevent unexpected movement, make sure the throttle is closed and the rear brake is locked before moving the scooter off its center stand.
- rear brake lever
- brake lock knob
- throttle
2. Stand on the left side of the scooter and push it forward and off the center stand.
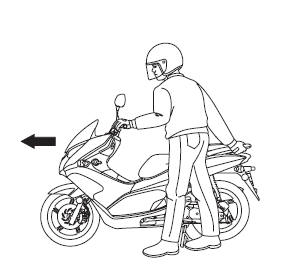
3. Mount the scooter from the left side, keeping at least one foot on the ground to steady the scooter.
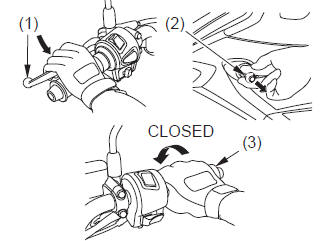
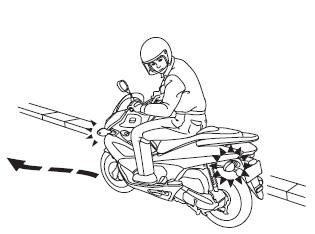
4. To unlock the rear wheel, squeeze and hold the rear brake lever (1).
Press the brake lock knob (2) down while pushing in the center button (4).
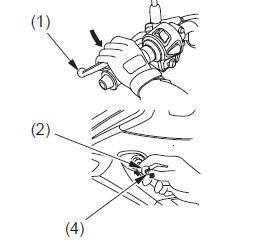
- rear brake lever
- brake lock knob
- center button
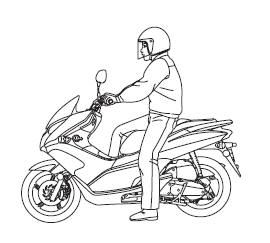
5. Before starting off, indicate your direction with the turn signals, and check for safe traffic conditions. Grasp the handlebars firmly with both hands.
6. To accelerate, open the throttle (3) gradually. The scooter will move forward.
Do not blip (rapidly open and close) the throttle as the scooter will move forward suddenly.
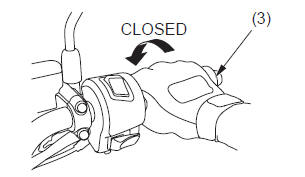
7. To decelerate, close the throttle.
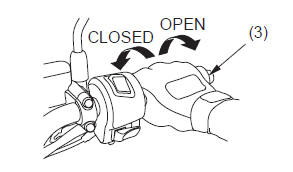
- throttle
8. To slow the scooter, reduce the throttle (3) and apply the front (4) and rear (5) brakes together.
Using only one brake reduces stopping performance. Excessive brake application may cause either wheel to lock, reducing control of the scooter.
- throttle
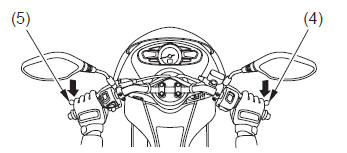
- front brake
- rear brake
9. When approaching a corner or turn, slow the scooter by closing the throttle (3) fully and applying both the front (4) and rear (5) brakes at the same time.
10. After completing a turn, open the throttle gradually to accelerate the scooter.
- throttle
- front brake
- rear brake
11. When descending a steep grade, close the throttle (3) fully and apply both the front (4) and rear (5) brakes to slow the scooter.
Avoid continued use of the brakes, which may cause the brakes to overheat and reduce braking efficiency.
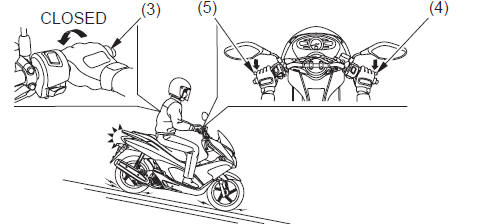
- throttle
- front brake
- rear brake
12. When riding in wet or rainy conditions or loose surfaces, the ability to maneuver and stop is reduced. For your safety:
- Exercise extreme caution when braking, accelerating, or turning.
- Ride at slower speeds and allow for extra stopping distance.
- Keep the scooter as upright as possible.
- Use extreme caution when riding over slippery surface such as railroad tracks, iron plates, manhole covers, painted lines, etc.
Braking
Your scooter is equipped with a Combined Braking System. Operating the front brake lever applies the front brake. Operating the rear brake lever applies the rear brake and a portion of the front brake. For full braking effectiveness, use the front and rear brake levers simultaneously.
As with a conventional scooter braking system, excessively hard application of the brake controls may cause wheel lock, reducing control of the scooter.
As a general rule, the front braking system provides about 70 percent of total stopping power.
To slow or stop, apply the front and rear brake levers smoothly.
Gradually increase braking as you feel the brakes slowing your speed.
For support, before coming to a complete stop, put your left foot down first, then your right foot down.
Applying the brakes too hard may cause the wheels to lock and slide, reducing control of your scooter. If this happens, release the brake controls, steer straight ahead until you regain control, then reapply the brakes more gently.
When possible, reduce your speed or complete braking before entering a turn.
Avoid braking or closing the throttle quickly while turning. Either action may cause one or both wheels to slip and reduce your control of your scooter.
Your ability to brake in a turn and to brake hard in an emergency situation are important riding skills. We suggest attending a Motorcycle Safety Foundation experienced rider training course to retain these skills.
When riding in wet or rainy conditions, or on loose surfaces, the ability to maneuver and stop will be reduced. All of your actions should be smooth under these conditions. Rapid acceleration, braking or turning may cause loss of control.
For your safety, exercise extreme caution when braking, accelerating or turning.
When descending a long, steep grade, use both brakes intermittently. Continuous brake application can overheat the brakes and reduce their effectiveness.
Riding with your hand on either brake lever may actuate the brakelight, giving a false indication to other drivers. It may also overheat the brakes, reducing effectiveness.
Parking
1. Look for a level parking area. If you can't park on a paved surface, make sure the ground surface is firm, especially under the center stand.
Make sure flammable materials such as dry grass or leaves do not come in contact with the exhaust system when parking your scooter.
If you must park on a hill, position the rear tire against the curb at a 45 degree angle.
2. Use the side or center stand to support the scooter while parked.
- To lower the side stand, use your foot to guide it down.
- Check that the side stand is down all the way so that the side stand ignition cut-off system is activated.
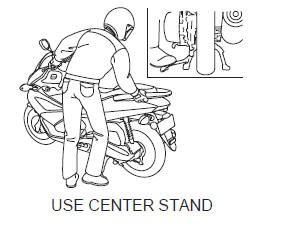
- To lower the center stand, stand on the left side of the scooter. Hold the left handle grip and the left passenger handrail. Press down on the tip of the stand with your right foot and, simultaneously, pull up and back.
- If you have to park on a soft surface, insert something solid under the stand for support.
3. Use the steering lock, which locks the handlebar in place. Turn the handlebar all the way to the left or right. Push in on the ignition key (1) and turn it to LOCK. Remove the key.
(To unlock the steering lock, insert and push the key in and turn it to the right to the OFF position.)
LOCK STEERING
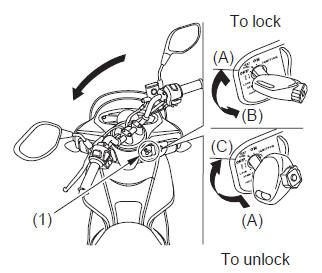
- ignition key
- push in
- turn to LOCK
- turn to UNLOCK
4. Use the helmet holder wire (2) stored in the tool kit to secure your helmet with your scooter:
- Open the seat.
- Route either end of the helmet holder wire through the helmet's D-ring (3).
- Hook the loops of the wire onto the helmet holder (4).
- Lower the seat and lock it securely.
To remove a helmet, open the seat. Remove the helmet holder wire and store it in the tool kit when it is not used. Lower the seat and lock it securely.
UNDER SEAT
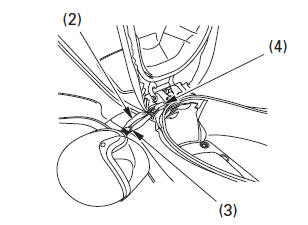
- helmet holder wire
- D-ring
- helmet holder
Theft-prevention Tips
- Park your scooter in a locked garage whenever possible. If a garage isn't available, park in a concealed area or in a well-lit area with enough pedestrian traffic to discourage a thief.
- Always take the ignition key with you.
- Always use the steering lock, even if you're parking for just a minute or two. A thief can easily push an unlocked scooter to a waiting truck.
- In addition to the steering lock, use a good quality anti-theft device made specifically to lock a scooter to a secure object.
- If you decide to use an anti-theft device, select one of good quality and be sure to follow the manufacturer's instructions.
- Keep your owner's manual, current registration, and insurance information with your scooter. This will make it easier for the authorities to find you if your scooter is stolen and recovered.
Riding with a Passenger or Cargo
Your scooter is designed to carry you and one passenger. Whenever you add a passenger or cargo, you must be careful not to exceed the total load limits for this vehicle. Make sure your cargo is properly secured.
Be aware that carrying a passenger or heavy cargo can affect acceleration, braking, and handling.
Before riding with a passenger, make sure your passenger is wearing the proper protective apparel.
Tell your passenger to hold the passenger handrails or your waist, lean with you in the turns, and keep their feet on the passenger footpegs at all times, even when the scooter is stopped at a traffic light.
See also:
 Honda PCX125 - Owner's Manual > Safe Riding Precautions
Before riding your scooter for the first time, please review the Scooter Safety section beginning on page 1, and the Before Riding section beginning. Even if you have ridden other scooters, take time to become familiar with how this scooter works and handles. Practice in a safe area until you build your skills and get accustomed to the scooter's size and weight.
 Rider's Manual BMW R 1250 GS GSA
 Owner's Manual Harley-Davidson Sportster XL1200X Forty-Eight
 Owner's Manual Honda CBR650R
 Service manual Honda CBR650
 Owner's Manual Honda PCX125
 Owner's Manual Kawasaki Z1000SX
 Service manual Kawasaki Z1000SX
 Owner's Manual Lexmoto Echo
 Owner's Manual Royal Enfield Interceptor 650
 Service manual Royal Enfield Interceptor 650
 Owner's Manual Yamaha MT-07